Lately I've been obsessed by printing. Specifically, making prints by using a gelli pad and a roller (known as a brayer). I've bought a selection of acrylic paints, several stencils and a ream of photocopier paper. I've also gathered up lots of things to add texture to my prints. Bubble wrap, bottle tops to make the outlines of circles with, nuts and bolts, dried poppy seed heads, and so on.
I've been watching lots of videos on YouTube about gelli printing, and that led me down a very enjoyable rabbit hole of creativity. I've been introduced to the concept of art journals, of making your own simple books and using them to print in or make collages in or paint and stencil. So, I've made three simple art journals of differing sizes, and finished those off today, making covers for them.
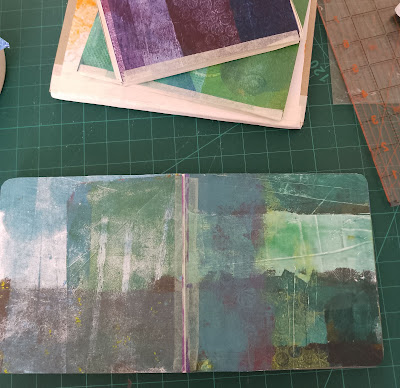
I've also come across a great idea from an artist called Drew Steinbrecher. He makes wonderfully bold prints, some of which he's used to completely cover board books. You know the kind of thing. Chunky books designed to be handled by very young children. The boards are sturdy enough to make them suitable for glueing collage material on to. I wanted to try this technique, so picked up a board book from a charity shop. (Funnily enough, there aren't that many to be found in charity shops. Maybe because parents throw them out rather than donate them as the books end up damaged or drawn on with crayons or felt tips.) 'Little Rabbit waits for the moon' is a very sweet book, but sorry bunny, you're about to disappear. This photo is the new look front cover, though the picture's not come out clearly enough. You can't see the lovely metallic sheen to the greenish-gold background colour. I'll try and take another photo tomorrow when the light's better. Turning from the cover, I opened the book to the first double page spread. These are the first inner pages I decorated, using cut up strips from the stash of gelli printed papers I'd amassed over the last few days. I chose a blue theme, as you'll see below. I laid the strips down in a pleasing order, then made liberal use of a glue stick to secure them in place. A tip I learnt from the videos was to leave a small gap either side of the centre spine. Then, glue a strip of tissue paper over that small gap. It means you don't get any messy crumpling or wrinkling down that spine when the book's opened and closed. Maybe the tissue has a bit more 'give' in it than the more substantial printed papers either side?The next two pages of the board book had yellow as their theme. Though I did sneak some turquoise and a smidgeon of rosy pink in there too.
After that, we go green. All abstract and moody with subtle greens, not flashy in-your-face ones.Then it's pink, making sure it's not too Barbie-fied. Actually, that central strip of tissue is looking suspiciously like Barbie pink ... I've still got another double-page spread to do, plus I need to finish off the cover. Then the plan is to work into each page, adding stenciling and masking off areas, applying more detail to make the pages really unique.I'm lovin' using the board book as a surface to work on, and would definitely recommend you experiment with this method of journaling too. Of course, you don't need to use handprinted paper, but can personalise the book according to your likes and dislikes. Even incorporate fabric, haberdashery trimmings, fragments of vintage embroidery, etc.
If you're asking online inspiration, try Drew Steinbecher's output on YouTube. Oh, and he also does a good short video on making a speedy art journal from just one sheet of paper, cutting and folding it to make the booklet. I'm trying that next! Have fun.


Comments
Post a Comment