Wednesday 29 November 2023

How to make these decorative birds

 I suggested yesterday that I'd run through how to make a fabric bird wall or window hanging (can't think of a snappier title for it than that!) so here goes.  I'll start with the first decorative hanging I made.  

It's something you could make in any colour combination you want, and would look good hanging at a window with translucent beads that'd catch the light  
I used five birds for this, but you could make it longer if you prefer.  (Incidentally, if you're wondering about what's hanging off the bottom on this, it's a metal Christmas decoration, shaped like a lantern.  For some reason I thought it looked appropriate to leave it there, looped over the end.)  
WHAT YOU'LL NEED TO GATHER TOGETHER: 
Assorted scraps of fabric for the front of the birds - aim for a mix of colours and textures.  Silk looks good, as does anything with embroidery or intricate patterns.  You might aim for a hippy-ish boho look, or maybe you're more the minimal Scandi type?  Pick your poison.  

Backing fabric - it can be the same on every bird or wildly different.  A fat quarter would be more than enough for this project.  

Enough felt of any colour to cut out five bird shapes from.

Gold coloured thread - I used DMC brand, precious metal effects E3852 

Polyester wadding or tiny scraps of fabric to be used as stuffing.

A good selection of beads in various sizes and colours.  The holes need to be large enough to accommodate doubled-up thread.  

A few sequins, tiny bells, anything you want to add for embellishment.

Sewing thread, a needle and dressmaking pins, scissors.

A small piece of card or thick paper, and a pen or pencil.

A glue stick (optional).

A metal or plastic ring, perhaps a piece of costume jewellery or even a washer!  This is a cheap ring I used.  It might've come out of a cracker!

HOW TO ASSEMBLE:        

The first step is to take your card/paper and draw a stylized outline of a bird.  You don't need to be any kind of artist to do this - I'm certainly not - but make sure your bird's not too skinny.  It has to be plump enough to have a decent amount of filling.  When you're happy with the shape, cut it out and use this as your template.  

Now, decide whether you want all your fabric birds facing the same direction, or two facing left and the others facing right.  Let's assume all your birds will have their beaks facing right.  Use your template to cut out five bird shapes from a piece of felt.  Doesn't matter what colour the felt is as it's not going to be seen on the finished design.  

Next, take your fabric scraps and arrange them on top of each bird.  You want each bird to look unique, so take your time in getting an arrangement that pleases you.  Do you want all five birds to have the same colour beak, for instance?  

Once that's done, either use dressmaking pins or a combination of glue stick and pins to secure your scraps, turning under raw edges to neaten things up.  Then sew the scraps in place, either using a basic running stitch or a fancy embroidery stitch.  The back of your bird should look similar to this in respect of the fabric raw edges being folded over so they're not visible on the front side.

Once that's done, take the DMC gold thread and use chain stitch to represent the outline of a wing.  You could also add lines for the beak if you wanted.  

Once the front of the bird's stitched, lay it on a piece of backing fabric, wrong sides together,  Pin around the edges.  Sew the two pieces together, leaving a gap in the bird's back of about 4cm.  Turn your bird right sides out.  

When all five birds have their backing attached, take your chosen filling and lightly stuff the birds.  You don't want to overfill them, aim for them to be padded rather than full-to-bursting.  Sew up the gap in the back. 

Arrange your birds in the order they're going to hang, and with beaks and tails facing in the correct direction.  Take a strong sewing thread, from which you're going to cut a length that's double your completed hanging.  I used approx 155cm, but better to be a wee bit longer than too short, so don't be stingy with the thread.  

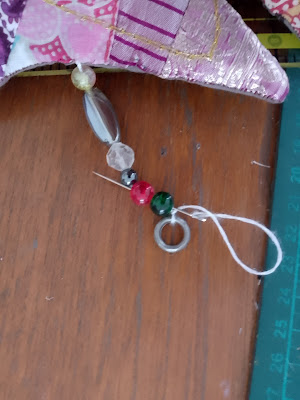
With double-thread on your needle, attach the bead that's going to be at the base, as per the photo below.

Tie a couple of firm knots to secure.  The tails are going to be hidden under the next beads you'll use.

After adding four or five beads, you're going to add a bird.  Push your needle through the bird, through the stuffing, from its belly up to the top of its back.  So the needle goes upward, entering at the lower mid point of the bird's belly and exiting at the midpoint of its back  

Now add more beads.  Try to get a mix of colours, shapes and ones that're translucent and others opaque.  Aim for the spacing between each bird to be reasonably equal, about 9cm.  

Keep adding birds and beads until you've attached all five.  After the fifth bird, use a few more beads then wind your thread a few times around a small ring.  

Make firm knots to keep everything in place, hiding the thread tails under the beads.  I then wound gold thread over the white double sewing thread I'd used, before adding a sparkly ribbon tied into a bow.  

That's pretty much it.  You can sew on sequins, little cat-collar-style bells, fragments of costume jewellery, seed and bugle beads, any embellishment you like.  If you wanted to make a variation on this decorative hanging, maybe use dried lavender to stuff the birds, if you'd enjoy the scent.  I'm sure you've lots of other ideas how to make these birds unique in ways that reflect your style.  

I hope this instructions are reasonably clear, but let me know if there's anything that needs clarifying.  


Tuesday 28 November 2023

Birds and cat collar bells

My spirits definitely lift when the sun makes an appearance, even if it's a bright but distinctly chilly day as it was this morning.  I've been finishing these notebooks, meant as Christmas gifts.  I'm not the world's best at accurate cutting when it comes to the pages inside, but I'm improving as I make more of these little books. 

They contain blank copier paper, and I've used a corner-cutting device to make the pages look a wee bit more professional.  The card used as covers has itself been covered by my gell prints, and I've used different prints outside and inside to add extra interest.  Hopefully these books will be well received when they turn up in various Christmas stockings.  
I managed to get a hefty wedge of cardstock for a bargain price of a fiver yesterday.  I don't bother much with Facebook - and certainly don't post any highly personal info on it - but occasionally I browse the marketplace section, and found someone local selling a box of assorted card for a fraction of its retail price. 
There were also several sheets of rather schmaltzy sentimental decoupage images, but I'll bundle them up and drop them off at the charity shop.  I'm sure an enthusiastic cardmaker or scrapbooker will snap them up.  
After I finished messing about with making notebooks I reluctantly pushed the hoover around and washed dishes, then it was on to a sewing project that's hung around way, way too long.  Ages ago I made these decorative birds that hang in my front room.
I wanted to make a few more strings of these, but that intention stalled, so today I dug out the birds I'd started making and resumed my efforts.  
I'd made several in mainly blue fabrics and slightly more in pinks.  I worked on five of the pink birds, and got them 'stuffed' and sewn up, and strung on a length of beads too.

I'll write a blog post, probably tomorrow, about how I've put all this together, but for now I'll finish this string of birds off with added sequins for a little extra sparkle and a few bells for extra jingle!  The bells are ones that once adorned cats collars.  The collars are long gone, as sadly are the cats, but I kept the bells as - isn't this what we crafty minded folk always say? - I knew they'd come in useful one day.  
This plastic tub is the less-than-glamorous home to various jars and tins containing seed beads, sequins, bugle beads and small pieces of costume jewellery like single earrings or brooches with broken fastenings.  On the left is a Dairy Box tin, from the days when an assortment of chocolates was something special and came in a metal container instead of a disposable cardboard box.  I think this particular tin's from the 1950s, and it's very battered and worn  It's impractical to imagine we could return to a time when confectionery was sold in tins, but modern packaging is so wasteful, there's got to be a better way.  
Oh well, I need to get on with sewing bells on to birds tails - like that's a perfectly normal thing to write! - have a good evening, and maybe wander back this way in a day or two if you want a rundown of how to make these decorative birds.  Bye for now.  

Sunday 26 November 2023

Brrr! It's getting cold ...

SATURDAY:  There's no doubt winter's well and truly upon us, is there?  Last night was the first frost for many, many  months, and I'd to crack the ice on the makeshift birdbath this morning.  I made sure I topped up the peanut feeders for the hungry little birdies.  This morning I got the boring things out of the way - laundry, hoovering, paying bills - and spent a little while messing about with making a Victorian purse puzzle.  If you've not come across these before, and I hadn't until a couple of days ago, they're easy to make once you figure out which fold goes where. 

If you head over to YouTube there's a short video by Leapling Studio, titled 'Make with Me: Victorian Puzzle'.  The only slightly tricky bit is creating the windmill shape, but once that's understood then you've cracked it.  I'm not much good at drawing, but I splashed watercolours paints and coloured pencils over a square of sketchpad paper, and am still trying to conjure up an underwater scene.  I'll add metallcs for shimmer and shine.  

Apart from messing about with arty stuff, I'm trying to do some clutter-clearing.  Listing clothes I don't wear on eBay, taking broken or outdated electrical equipment to a recycling point, and passing on books I started but didn't like and never finished.  I reckon I've got more ruthless about novels that disappoint as the years have gone by.  I used to grit my teeth and plough on, but now I'm more likely to take them to the charity shop for someone else to (hopefully) enjoy.  I recently finished the fifth of Robert Galbraith's Strike series, and am in the library reserve queue for the latest, plus the new Richard Osman.  I'm 127th in line for the Strike novel and 211 for Mr Osman's!  Maybe Santa will bring me a book token and I can read them sooner?  Fingers crossed, eh?  
On the subject of reading, I've just started 'The Mercies' by Kiran Millwood Hargrave.  It's apparently based on a true story that happened in the early 1600s and concerned a remote Norwegian island.  All the men went out to sea, fishing, but a violent storm caused them to drown.  Leaving the island's women to take up their late husbands, brothers and fathers work, and to show an independence of spirit that wasn't welcomed by wider society.  The king at the time was a fan of our James I, who himself was a fanatic about fighting supposed witchcraft, and the Norwegian king summoned a Scottish witch hunter to deal with these strong minded, capable women.  It seems many women were condemned as witches and killed because of that misogynistic mistaken belief.  I'm looking forward to really getting stuck into 'The Mercies'.  It's looking promising.  
SUNDAY:  I was going to write more and take photos of the Victorian purse puzzle now I've added more detail to it.  But Saturday's been and gone, and it's now Sunday evening, and the artificial light's not bright enough to take a decent picture.  Anyway. I'm warm and cosy, full of pasta and about to soldier on with online Christmas shopping.  So that's all for now. Bye.  

Monday 20 November 2023

Paper flowers, leaves, feathers ...


I had a few requests after posting this photo on Facebook, people asking if I could explain how I made these paper flowers. Your wish is my command, and here's the info.  It's all very simple and you don't need any advanced drawing skills.  So grab a stack of gell prints, a pair of scissors and off we go! 
The type of print that seems to work best is one where there's a fair amount of detail, rather than a block of solid plain colour.  Prints where you've maybe channelled your inner Elizabeth St. Hilaire and 'layered layered layered' as she's always urging us to do. 
POPPIES
If we start with simple poppy seed heads and stalks, they're cut freehand from paper that's mainly shades of orange and brown.  I glued those on to a sheet of white copier paper, then cut them out, leaving a narrow border around each.  Backing the gell print with the white paper adds that contrasting border, but also strengthens the piece, especially the thin stalks.  
I've added lines, using a black biro and also a white paint pen, to emphasize the seedhead's shape.  This is only ever going to be a stylized version, you're not aiming for realism.  
DOTTY FLOWERS
These flowers are made from three separate pieces.  Cut out a flower head, as large or small and with as many petals as you like.  You also need a smaller circle of the same print, also a stalk with a single leaf.  (Or two or three!  Personalise as you want.)  Glue all these on to a sheet of paper.  This can be plain white or coloured, or a book page with text on it.  When the glue's dried, cut out the shapes leaving a border around each piece.  The circle is glued on to the flower head, and the stalk's attached, hiding the top of the stem underneath the flower head so it looks neat 'n' tidy.  I added a few details with a white paint pen.  
ECHINACEA
The echinacea (cone flowers) are made in a similar kind of way.  With those I also added a different colour scrap of print for the flower's centre, and used a black pen (my trusty Bic biro!) to emphasize the petals and leaves.  I haven't got the petals on these exactly right yet as they're not delicate enough, but nevermind. 

FOUR or FIVE PETAL FLOWERS
With these, I cut individual petals from a gell print, glued them on to paper in a circlular shape, then outlined each petal with black pen and cut each flower out, leaving a narrow border. around each.  Easy-peasy-lemon-squeazy.  Because these are such simple flowers, they really do look better if your print's got interesting patterns and variations in colour.  

SOMETHING-LIKE-A-TULIP FLOWERS
Cut out a stem from a gell print.  Then a leaf shape or two, followed by a flower head that's vaguely tulip-like.  Glue the stem on to a sheet of paper.  Then add the leaf/leaves - which look better at an angle than horizontal to the stem.  Now attach the flower head.  Once the glue's dry, outline with a pen and add any details you want to suggest petal folds or leaf markings, and cut out your completed tulip.  Be careful when handling as the spindly stems are rather prone to snap or tear.  

FEATHERS
I've not even tried to use realistic colours for these, though that'd be a good challenge, wouldn't it?  Producing a suitable gell print to look like the colours of a starling's feathers or a magpie.  That's an idea I'll have to squirrel away for another day.  
I cut out a basic feather shape, then snipped at the edges to suggest their wispiness.  Details added with a white paint pen.  (Not a Posca pen, incidentally.  Instead I bought some pens from 'The Works'.  Two white paint pens and two black, for three quid.  If your budget doesn't run to buying the Posca version, they're a decent alternative.)  

FOLIAGE
An elongated oval is the easiest shape to cut, and is instantly readable as a leaf.  I cut out my leaves - keeping to odd numbers as they look best, either three on each side or five - and glued them on to white copier paper, having drawn a stem on it first.  The stem can be straight, or have a slight curve to it.  
Then I outlined each leaf with a black pen before cutting them out.  You can also glue your foliage on to a book page so a tiny bit of lettering is visible in the outline.  Or glue them on to black paper or brown kraft paper, both give interesting effects.  


Okay, here are some examples of where I've used these various flowers, leaves etc in collages, handmade books etc.  
Here's more.
Want a close-up?
And here's - 
Incidentally, if you begin making these flowers, etc, and find you get addicted and end up with heaps of them - easily done! - a perfect way to store them is in a photo album.  This works especially well for those flowers that have spindly stalks liable to tear.  
This otherwise unused album has a rather boring cover, which I re-did with a gell print and some washi tape.  The plastic pockets are ideal for all the little bits & bobs you've made.  You can probably come across an album if you're an avid charity shop rummager  
Everything's easy to see, and it's easy to keep track of what you've made. 

I hope some of my blog post's helpful, and feel free to ask questions or comment, I'd appreciate your response.  Finally, I'm thinking of what else I can make with gell prints, and am messing about with waves and fantastical sea creatures.  
Still a work-in-progress, but it's fun trying to figure out what'll look good.  Though I'm running out of suitable blue gell prints.  Might have to make some more!  Any excuse, eh?  


Sunday 19 November 2023

Tempus Fugit

I was toddling around Leeds city centre yesterday, and re-acquainting myself with how busy it gets on a Saturday and how overwhelming all the crowds and noise feel.  Sensory overload!  Anyway, I was attending a Let Women Speak event, listening to speeches about defending womens hard-won rights and about child safeguarding.  I realised there was also an anti-war march winding through the city centre, so a lot of police were in evidence, vans parked everywhere and police horses on duty too.  
Before the event started I had some spare time, so took a few photos of the wonderful architecture you can find in the surrounding streets.  Lots of Victorian buildings, still looking splendid so many decades later.  I wonder if the same will be same for our modern tower blocks?  I bet they don't stand the test of time as well.  I'm not much of a photographer, as you'll see.  
This splendid example of 1930s art deco is the Tetley building, now an art centre.  Joshua Tetley, 1778 - 1859, was in the brewing industry, and this building's all that is left of the former brewery site.  Ignore the hideous blue construction on the right of the picture.  It's probably practical, but it's a real eyesore, don't you think?  

Not far from the Tetley is what used to be the Salem Congregational Institute.  I would've preferred a full length picture of this, but that would've included a car parked directly outside, a chunk of ugly modern fencing and an oversized wheelie bin!  Built in 1791, this is Grade 2 listed.  A little light research informs me this is the oldest non-conformist chapel in Leeds, and it's been fully restored inside and contains 'several colocation data centres' (nope, me neither) as well as offices, an exhibition space and a licensed bar.  Also a glass floored 350 seat auditiorium, so sounds like a place that'd be fascinating to get inside and have a good root around.  
This is a detail from Leeds Bridge over the River Aire, and dates from 1870.  It's also Grade 2 listed.  The owls and sheep form part of the Leeds Coat of Arms.  Wool was a big industry years ago, so the sheep's fleece symbolizes that, while the three stars relate to Sir Thomas Danby who was the first mayor of Leeds.  The owls were taken from Sir John Savile's coat of arms, being the first alderman of Leeds.  
I don't know the name of this building, but it reminds me of the famous flat iron in New York.  (Not that I've seen it in person, you understand.  Not been that lucky.)  Presumably this oddly shaped building was made to squeeze into a corner, hemmed in by others, but they've been demolished and it's remained standing proud.  
I'll round-up these architectural gems with this beauty.  Tempus fugit, or times flies.  Doesn't it just?  This stands above what used to be a clockmakers, fittingly enough.  John Dyson, 1845-1916, ran his business from here, and it's well worth hopping over to this website page for a fascinating glimpse of his life and career.  Including details of a 'time ball' that was linked electrically to Greenwich and which spectacularly dropped at 1pm every day so locals could set their watches to London time.  I bet that was a real crowd-puller.  The shop closed for good in 1990, but it must've been a heck of a sight in its heyday.  

Well, what else can I blather on about?  Actually, I'd like to show you a couple more pictures, this time of a business closer by.  It's a flower shop, called appropriately 'The Flower House' in Garforth.  

I passed by this morning, and they've put up their Christmas windows.  I'm not one for decorations before December, but I make an exception for this creativity. 

Doesn't it look festive?  Okay, that's all for today.  I hope you enjoy what's left of your weekend.  Bye!


The Purple Pouffe Pincushion

  I have to limit time spent on Instagram as it's addictive.  Once you start scrolling through the endlessly inventive creations on ther...