Make a paper star

Well, I have to admit I'm feeling quite pleased with myself.  I wasn't convinced I could make this work, but it's really not too bad at all.  My first attempt at making a paper star.  

This all started because I was trawling through YouTube, looking at videos on how to successfully print using the gelli plate.  Too many of my prints were ending up muddy messes, so I needed to learn some techniques.  I came across an American artist called Elizabeth St Hilaire and one of her videos called 'Fabulous Shimmery Gelli Printed Paper Star, Easy!'  I mean, with a title like that, how could I not watch it?  

She made a wonderful looking decorative star, very bright and bold, and constructed out of paper bags.  Yup, a stack of humble, everyday paper bags.  After they were printed on, complete with metallic and iridescent paint to make them shimmer, she cut the bags into a point at one end and glued them together.  The construction's quite straightforward, and I wanted to try it straight away.

Not having a handy stack of paper bags, and not wanting to wait until Amazon or eBay could deliver them, I used photocopier/printer paper instead.  

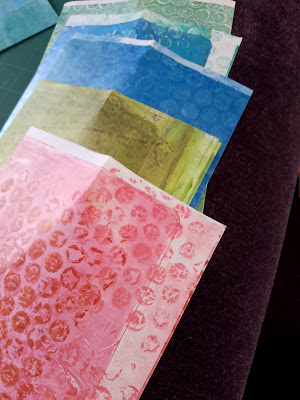
I printed sheets of it in various colours, and ended up with twelve I liked.  Then I folded and glued two sides of each sheet of paper to make the bags.  

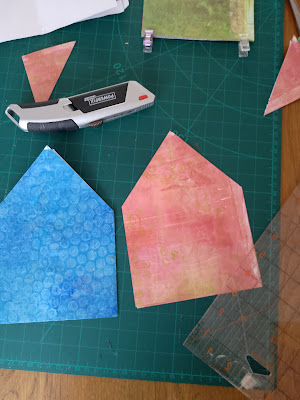
Deviating slightly from the order in which it's done in the video, I found the centre point at the opening of each bag, and cut the top part into a point.  So each bag looked like the shape a child draws when they imagine a house.  

Stacking up my twelves 'house' shapes, it was time to assemble the star.  It was a case of being heavy handed with the glue stick, firmly pushing the glued pieces together to ensure them bonded well.  

It was a lovely feeling to unfurled my star and see it take shape.  

I punched a hole in two points and threaded a ribbon through for hanging, and am already planning to make another star.  Maybe Christimas colours, lots of red and gold?  It'd look good to print on both sides of the paper too, so when the star's opened out there's no white paper on view.  Unless I printed on coloured paper in the first place?  

I'd love to think some of you might have a go at creating a paper star too.  You could use actual paper bags instead of making them, to speed up the process, or use fancy wrapping paper instead of printing on plain paper if you don't want to mess about with acrylics, stamps and stencils.  The link for the YouTube video is https://www.youtube.com/watch?v=lvbPzUpg224&t=7s.  (I'm not great with technology, so I hope that gets you there.  Otherwise just type in the artist's name, Elizabeth St Hilaire.)  If you don't want to watch the entire video, simply watch the first four minutes or so, then skip ahead to about 24 minutes and see how the star's constructed.   Good luck!   


Comments

Popular posts from this blog

Fabric bowls & electrical cables ...

To add to my seemingly never ending list of works-in-progress, I've started making a fabric bowl.  Or should I call it a fabric basket?  I'm not sure.  Anyway, I've made the odd bowl or two before, like this blue & white one that I keep cotton perle in.   I decided to use upholstery material, which has both advantages & disadvantages.  On the good side, it has a certain stiffness, which helps the bowl stay in shape.  On the irritating side, the kind of material I'm using frays like mad, and I'm forever picking up threads off the carpet.  The bowl's a simple construction, and I've used a circle of cardboard covered with brown felt for the base.   It'll look much better when I've embroidered and stitched into it.  I've made a start on that, and appliqued on a rectangle of plum coloured velvet for extra interest. When not stitching, I've been catching up on my reading.  I finished C J Sansom's 'Dark Fire'.   Real...

Threads of Freedom and charity shop bargains

  It's Saturday afternoon, and I haven't done half the things I'd meant to.  Partly because I spent most of this morning messing about with paints, stencils and the gell plate.  Never mind, everything on today's 'To Do' list will join tomorrow's 'To Do' list ... it's hardly life or death if I don't haul the hoover around the room or pull up weeds in the front garden.   I thought I'd show you what I made on Wednesday.  I'd gone to my monthly StitchArt group, and this time we did something a little different.  There's a project called 'Threads of Freedom' which is working with various community groups across the city.  It's about creating little stitched pieces, some of which will be included in a textile panel to go on display at Leeds art gallery.  There was lots of fabric we could choose from to sew with, and I picked this vintage tray cloth with the roses embroidery.   My own embroidery's not a patch on those flo...

Another fabric bowl & what's starting to look like a craft room ...

  Hello on what's been a beautiful autumn day.  Bright blue clear sky, a chilly start but warming up in the afternoon.  I've been on a long walk around a local nature reserve, not wanting to stay inside when it's so lovely outdoors.   In the last week or so, I've been finishing this fabric bowl, and have started making another.   But mainly I've been having a bit of a change-around in my house.  I've hauled furniture from one room to another, clutter-cleared cupboards and bagged up things for the charity shop, and generally hoovered and cleaned all those dusty corners.   I'd finally made a decision about turning the dumping ground of the front bedroom into a craft room.  It's taking shape, though it really has taken some effort.   Larger pieces of material are stacked on shelves, grouped into colours.  Lower down is my Sissix machine and die cuts, and at the base of the shelving are beads and jewellery making supplies...