HOW TO MAKE: a triangular pin cushion, boho style


This is a quick 'make' for anyone who wants a pincushion that's so bright you can't possibly mislay it!  It's a simple triangular shape, and you can make it any size you like.  I'd previously sewn this larger purple one.  
Proving you can leave off the sequinned trim and metallic thread if you really want to.  Anyway, let's get started.  You need two squares of equal size in a non-stretchy fabric.  I used calico which gives a good strong base for you to stitch into.  My squares were slightly over 4 inches.  Pick out lots of fabric scraps, and if you're aiming for a boho style then choose lively colours and patterns.  
Arrange your scraps so you can't see any of the calico base.  Use regular sewing thread or strands of embroidery thread to anchor your scraps down, adding decorative stitching and beads wherever you fancy.  I know metallic thread can be a pain in the neck to sew with, but it does add a lovely sparkle.  
You can layer sheer and semi-sheers on top of plains, sew on buttons or ribbon, anything to add interest.  
Keep stitching and embellishing until you're happy with your two squares.  
Once that point's reached, pin or clip your squares right-sides-facing.  Stitch around 3 sides, either by hand or machine.  
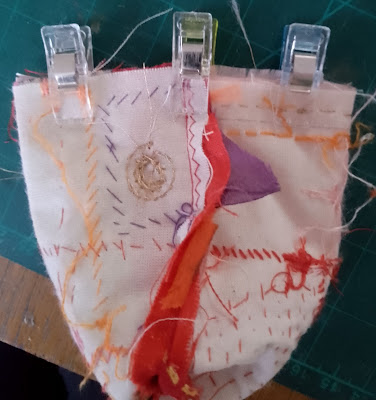
Here's the bit to make your pincushion into a triangle.  If you wanted to make a straightforward square cushion, you'd now sew a line from of stitches from side seam to side seam.  Instead, the centre seams are moved to the middle of that line.  Pin or clip your unstitched edge as shown below.  
I sewed a few stitches on the left and the right of this unstitched edge, which you can see in the photo below if you look at the top corners.  (It's so hard to write instructions and be clear enough!  Hope this makes sense.  If not, let me know.)   This leaves a gap large enough to turn your cushion right sides out.  
Do so, and use a pencil or similar to make sure the corners are nice and pointy.  Then take your cushion filling - I used polyester quilt wadding - and don't be stingy, make sure your cushion's well padded.  After that, it's simply a question of sewing the gap closed.  
I covered my closure stitches over with a ribbon, just to make it look prettier.  Even added a few more sequins too, for maximum bling.  

Hope you like this, and let me know if you make your own version.  I'd love to see them.  

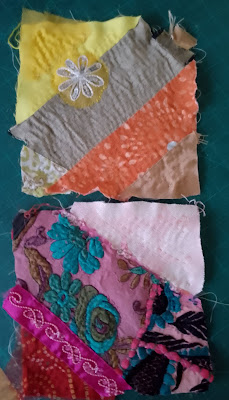
Okay, having written those instructions, and being in desperate need of a cuppa tea and possibly a little chocolate treat, I'll round things up with a last photo.  Another couple of scrappy blocks made, for the quilt or cushion or rice bag or whatever I eventually make!  Progress is being made, block by block ...  


Comments

Popular posts from this blog

Fabric bowls & electrical cables ...

To add to my seemingly never ending list of works-in-progress, I've started making a fabric bowl.  Or should I call it a fabric basket?  I'm not sure.  Anyway, I've made the odd bowl or two before, like this blue & white one that I keep cotton perle in.   I decided to use upholstery material, which has both advantages & disadvantages.  On the good side, it has a certain stiffness, which helps the bowl stay in shape.  On the irritating side, the kind of material I'm using frays like mad, and I'm forever picking up threads off the carpet.  The bowl's a simple construction, and I've used a circle of cardboard covered with brown felt for the base.   It'll look much better when I've embroidered and stitched into it.  I've made a start on that, and appliqued on a rectangle of plum coloured velvet for extra interest. When not stitching, I've been catching up on my reading.  I finished C J Sansom's 'Dark Fire'.   Real...

Threads of Freedom and charity shop bargains

  It's Saturday afternoon, and I haven't done half the things I'd meant to.  Partly because I spent most of this morning messing about with paints, stencils and the gell plate.  Never mind, everything on today's 'To Do' list will join tomorrow's 'To Do' list ... it's hardly life or death if I don't haul the hoover around the room or pull up weeds in the front garden.   I thought I'd show you what I made on Wednesday.  I'd gone to my monthly StitchArt group, and this time we did something a little different.  There's a project called 'Threads of Freedom' which is working with various community groups across the city.  It's about creating little stitched pieces, some of which will be included in a textile panel to go on display at Leeds art gallery.  There was lots of fabric we could choose from to sew with, and I picked this vintage tray cloth with the roses embroidery.   My own embroidery's not a patch on those flo...

Another fabric bowl & what's starting to look like a craft room ...

  Hello on what's been a beautiful autumn day.  Bright blue clear sky, a chilly start but warming up in the afternoon.  I've been on a long walk around a local nature reserve, not wanting to stay inside when it's so lovely outdoors.   In the last week or so, I've been finishing this fabric bowl, and have started making another.   But mainly I've been having a bit of a change-around in my house.  I've hauled furniture from one room to another, clutter-cleared cupboards and bagged up things for the charity shop, and generally hoovered and cleaned all those dusty corners.   I'd finally made a decision about turning the dumping ground of the front bedroom into a craft room.  It's taking shape, though it really has taken some effort.   Larger pieces of material are stacked on shelves, grouped into colours.  Lower down is my Sissix machine and die cuts, and at the base of the shelving are beads and jewellery making supplies...