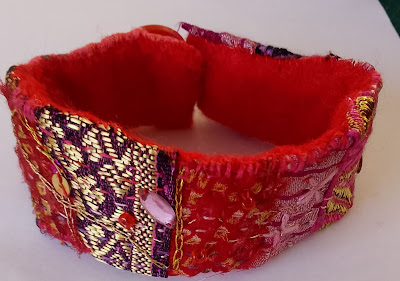
HOW TO MAKE: an embroidered fabric cuff

An embroidered fabric cuff is an easy project, and doesn't require any fancy stitches or expensive purchases.  If you're a seasoned crafter you're likely to have the materials already to hand, and possibly the only thing you might buy is a hair band.  But more of that later.  

Let's start with the previouis fabric cuff I made.  (On the right in the photo above.)  I was pretty pleased with it, but decided it was too wide (though very good for keeping your wrist warm on a cold day!).  I learned a few things from making my cuff, mainly forget any notion of minimalism.  This cuff works best when you go heavily on the embellishments.  You've a small area to stitch on, so don't skimp on making the most of it.  

I made a second version (above left), and here are the instructions if you want to make something similar.  

You need to gather together: 

2 pieces of felt, measurements discussed below, but mine were 8 inches x 1 & a half inches each.  

Assorted scraps of material, ribbon, braid.  

Small beads, buttons, sequins.  

Regular sewing thread and (if you have it) embroidery thread 

Scissors, dressmaking pins and a needle for hand-sewing.  

Either go with a specific colour scheme or throw caution to the wind and use a kaleidoscope of colours.  Whatever floats your boat.  

Firstly, check the size of cuff I've given is suitable as your wrist might be smaller or larger than mine.  If you like, cut out a piece of paper and wrap it around your wrist to check the sizing.  It doesn't need to be as loose as a bangle, but neither should it be overly tight.  When you're happy with it, cut out 2 felt pieces.  

Arrange your fabric scraps, braid etc on one of those pieces of red felt.  It doesn't matter about them overlapping the felt's edges as that'll all be safely tucked out of sight later on.  Use pins to keep your arrangement in place, or if you'd rather sew tacking (basting) stitches.  Fabric glue isn't the best alternative as your blobs of glue might show through any sheer or semi-sheer material.  
Either using regular sewing thread or embroidery thread, stitch your scraps down.  Make your stitches as visible or invisible as is pleasing to your eye.  
Here's the red felt completely covered on the uppermost side.  And in the next photo, this is what it looks like on the back.  
Now you've secured your fabric scraps to the base layer of felt, it's time to really go to town.  Add beads, sequins, little charms, tiny pearl buttons, shisha mirrors, bits of broken-up earrings or necklaces, anything and everything that catches your magpie eye.  Add plenty of stitching too.  It can be running stitch, or use chain stitch, fly stitch, do several French knots ...  YouTube videos are your friend here if you're not an experienced embroiderer.  There are lots of films available, and even ones specifically geared to us left-handers.  

Embroider around and into fabric patterns, such as flowers or dots.  The more you stitch into your cuff, the more durable it'll be.  At one end of the cuff, sew on a medium sized button.  Once you've completed this, you can add the hair band.  It is going on the reverse, at the opposite end to your button.  

You want a loop of elastic band overhanging the cuff end, as shown above.  As a temporary measure, use pins or sewing clips to position the elastic band.  To get a nice fit, try the cuff on with the fastening closed.  Not too loose?  Not too tight?  Adjust the size of the overhanging loop until it's right. 
Once you're happy with it, use lots of robust stitches to firmly sew the loop to the underside of your embellished cuff.  (By the way, regular hair bands are okay for this project, but a wee bit bulky.  Try to go for the much thinner bands.  These were a pack of goodness-knows-how-many, bought for a quid from Primark.  If you're really stuck for a hairband, improvise with a homemade loop of narrow elastic.)
The last stage is adding the backing.  This is the second piece of red felt you cut out earlier.  If your cuff's been densely stitched into, it'll shrunk slightly in the process, so trim your backing to the exact size now required.  
And that's it!  You're all done and dusted.  One pretty cuff to adorn your wrist and be the envy of your friends.  
Fingers crossed those instructions made sense, but if there's anything you're unsure of, please ask.  Okay, if you've enjoyed that and you fancy creating something similar, can I recommend my embellished cuff kit?
It's available on Etsy via my shop, and includes instructions, red felt, a selection of fabric scraps, a hair band (two actually, so you've got a spare).  Also, a shisha mirror, a dozen seed beads, a medium sized button, and two skeins of embroidery thread.  
This link takes you to my Etsy shop, and I really took care to put these kits together, so I hope you'll like them.  I've made five red/pink kits, and if they're popular I'll happily make more.  Plus, the intention is to make a blue themed kit.  Possibly even a black & white one too.  Let me know if you've any preferences.  

Okay, thanks for your time, and have fun with your sewing.  


Comments

  1. I love these cuffs, what a brilliant idea! xxx

    ReplyDelete
    Replies
    1. Hi Vix. I stopped by your blog earlier today, and was glad to hear your eye's improved a lot. Hope you have a wonderful holiday. It's much deserved after your enforced rest. Val x

      Delete

Post a Comment

Popular posts from this blog

Fabric bowls & electrical cables ...

To add to my seemingly never ending list of works-in-progress, I've started making a fabric bowl.  Or should I call it a fabric basket?  I'm not sure.  Anyway, I've made the odd bowl or two before, like this blue & white one that I keep cotton perle in.   I decided to use upholstery material, which has both advantages & disadvantages.  On the good side, it has a certain stiffness, which helps the bowl stay in shape.  On the irritating side, the kind of material I'm using frays like mad, and I'm forever picking up threads off the carpet.  The bowl's a simple construction, and I've used a circle of cardboard covered with brown felt for the base.   It'll look much better when I've embroidered and stitched into it.  I've made a start on that, and appliqued on a rectangle of plum coloured velvet for extra interest. When not stitching, I've been catching up on my reading.  I finished C J Sansom's 'Dark Fire'.   Real...

Threads of Freedom and charity shop bargains

  It's Saturday afternoon, and I haven't done half the things I'd meant to.  Partly because I spent most of this morning messing about with paints, stencils and the gell plate.  Never mind, everything on today's 'To Do' list will join tomorrow's 'To Do' list ... it's hardly life or death if I don't haul the hoover around the room or pull up weeds in the front garden.   I thought I'd show you what I made on Wednesday.  I'd gone to my monthly StitchArt group, and this time we did something a little different.  There's a project called 'Threads of Freedom' which is working with various community groups across the city.  It's about creating little stitched pieces, some of which will be included in a textile panel to go on display at Leeds art gallery.  There was lots of fabric we could choose from to sew with, and I picked this vintage tray cloth with the roses embroidery.   My own embroidery's not a patch on those flo...

Another fabric bowl & what's starting to look like a craft room ...

  Hello on what's been a beautiful autumn day.  Bright blue clear sky, a chilly start but warming up in the afternoon.  I've been on a long walk around a local nature reserve, not wanting to stay inside when it's so lovely outdoors.   In the last week or so, I've been finishing this fabric bowl, and have started making another.   But mainly I've been having a bit of a change-around in my house.  I've hauled furniture from one room to another, clutter-cleared cupboards and bagged up things for the charity shop, and generally hoovered and cleaned all those dusty corners.   I'd finally made a decision about turning the dumping ground of the front bedroom into a craft room.  It's taking shape, though it really has taken some effort.   Larger pieces of material are stacked on shelves, grouped into colours.  Lower down is my Sissix machine and die cuts, and at the base of the shelving are beads and jewellery making supplies...